Welcome Blessings!
(Tap 🔽 to see more topics!)


Table of Contents
ToggleYou’ve got the gear… Focusrite Scarlett Solo, the legendary Shure SM7B, and the powerful DBX 286s. You know this setup can make your audio sound incredible, but figuring out how to connect it all? Honestly, it’s a bit of a puzzle. We have all seen trams that look like an alien draws them. But don’t worry, we will translate that alien language into plain English.
Consider this your friendly guide to getting it right the first time. In today’s article, you will learn the setup in a super easy-to-follow way, whether you’re recording podcasts, laying down tracks, or just trying to make your videos sound better. We’ll answer all those common questions, clear up those confusing points, and add a few pro tips that’ll make you sound like a seasoned pro in no time.
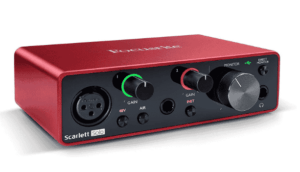
The Focusrite Scarlett Solo is mentioned frequently when people discuss getting into audio recording. And honestly, it’s easy to see why.
What’s Good About It:
Where It Might Fall Short:
The Focusrite Scarlett Solo is a fantastic starting point for anyone who wants to record audio at home. It’s simple, affordable, and delivers excellent sound. If you’re recording yourself, doing voiceovers, or laying down single-instrument tracks, it’s hard to beat. However, if you’re planning on recording multiple people or using mics that need a lot of power or MIDI support, consider something else. It’s an excellent tool for a specific set of needs, and if your needs match, it is a fantastic buy.
But who’s the Scarlett Solo really for? Turns out, it’s pretty versatile, but the truth is:
The Scarlett Solo is a solid choice for anyone wanting good audio without the hassle. It’s reliable, easy to use, and clean. Just keep in mind that the SM7B needs a little extra help to really perform.
You’ve probably heard folks rave about the Focusrite Scarlett Solo, the Shure SM7B, and the DBX 286s, and for a good reason. These three pieces of gear work together to create an excellent audio setup, especially if you’re aiming for that professional sound.
What is the catch? The Shure SM7B needs a lot of ‘oomph’ to shine. It’s what we call a ‘gain-hungry’ microphone. The Focusrite Scarlett Solo, on its own, doesn’t always provide enough power to make the SM7B sound its best. That’s where the DBX 286s step in. It acts as a middleman, boosting the signal and giving the SM7B the power it needs while also letting you shape your sound with those extra effects. It’s like adding a turbocharger to your audio setup.
Step 1: Tracing Your Audio’s Path (The Signal Chain)
Picture your voice as a traveler on a journey. It starts with the Shure SM7B, goes through the DBX 286s, onto the Focusrite Scarlett Solo, and finally ends up inside your computer. Each stop along the way ensures your voice sounds its best. We call this journey the ‘signal chain,’ and it’s your audio’s path.
In simple terms, your voice goes from the microphone, gets a boost from the DBX 286s, gets converted by the Scarlett Solo, and then ends up on your computer. It’s like a relay race, where each piece of gear passes the baton to the next, ensuring your audio gets to the finish line sounding fantastic.
Step 2: Connecting the SM7B to the DBX 286s
Okay, you’ve got your Focusrite Scarlett Solo ready, and now we’re getting those other two excellent pieces of gear hooked up. Let’s talk about connecting the Shure SM7B to the DBX 286s. This is pretty straightforward, even if you’re new to all this.
Step 3: Connecting the DBX 286s to the Focusrite Scarlett Solo
So, you’ve got your Shure SM7B plugged into the DBX 286s, and now it’s time to get that fantastic sound into your Focusrite Scarlett Solo. This step is where we connect the DBX 286s output to the Scarlett Solo’s input, and it’s pretty straightforward.
1. The Cable You’ll Need
2. Scarlett Solo Gain: Turn It Down
3. Scarlett Solo Input Mode: LINE is Your Friend
That’s it! Once you’ve made those connections, your signal will flow from the microphone through the DBX 286s and into your Focusrite Scarlett Solo, ready for recording. It sounds more technical than it is, trust me. Just take it step by step, and you’ll be fine.
Step 4: Adjusting Your Settings for the Best Sound
Now that you’ve got everything plugged in, we want to make it sound amazing. Consider this as the final touch, like seasoning a dish before serving. Let’s dial in those settings for that clean, pro-level sound we’re after.
1. First up, gain staging. It is like making sure the volume is just right, not too loud, not too quiet.
2. Now, let’s play with the DBX 286s’s cool tools.
Compressor- Imagine your voice has some loud parts and some soft parts. This tool evens them out, so everything sounds smooth.
De-Esser- Ever get those sharp ‘S’ sounds that can be harsh? This tool tames them.
Enhancer- This adds sparkle and clarity to your voice. Think of it like adding a little bit of polish.
Expander/Gate- This helps eliminate background noise. It’s like having a sound vacuum cleaner.
Essentially, you’re crafting the sound to your liking. Don’t be afraid to experiment, and trust your ears. There is no perfect setting. It is all about your taste and how you want to sound.
1. Do I need a Cloudlifter or FetHead with this setup?
No, because the DBX 286s provide enough gain to eliminate the need for an extra inline preamp like the Cloudlifter.
2. Why does my Scarlett Solo sound distorted?
If your audio sounds clipped or distorted, lower the gain on the DBX 286s and check that your Scarlett Solo is in LINE mode, not INST mode.
3. Can I use this setup for live streaming?
Yes! This setup works great for streaming, podcasting, and music recording. Ensure your Scarlett Solo’s buffer size is optimized in your DAW for low latency.

Now, you’ve got the Focusrite Scarlett Solo, the mighty SM7B, and the powerful DBX 286s all working together. It’s like building a team of superheroes for your audio. Look, on its own, the Scarlett Solo is a great start, but it’s like a car without enough fuel for the SM7B. Add in that DBX 286s, and suddenly, you’re cruising with a full tank, getting that crisp, professional sound you hear on your favorite podcasts and recordings.
You’re not just buying gear but investing in your voice, whether building a home studio, launching a podcast, or making content that stands out. It’s about giving your audience the kind of audio that keeps them listening. Honestly, this setup does that without emptying your wallet.
Think of it as giving your voice the VIP treatment it deserves. If you’re sitting there thinking, ‘Okay, but what about…?‘ or ‘I’m still a little unsure about…,’ don’t hesitate! Jump into the comments below. Share your thoughts, and ask away. Now, make some incredible recordings! Voila! Until next time!
Information Updated Date: August 31, 2024
Original Published Date: February 5, 2022
Disclosure: Shopping through our Amazon links costs you NO EXTRA FEES! Please note that we do not process payments or confirm orders. If you click the link or button, it directs you to Amazon’s website or app, where Amazon handles all transactions. This article actively participates in the Amazon Associates Program, an affiliate initiative designed to enable websites to earn referral fees by advertising and linking to Amazon.co.jp. We only endorse the products and services we have tested and strongly believe in; hence, our recommendations are rooted in this unwavering trust.
Arlene Tangcangco, Ph.D. candidate (タンカンコ道地ア-リ-ン) also known as Teacher AL, is a learner and teacher at heart. Driven by curiosity, she has explored various fields since she was 17. She was a working student who held multiple jobs as a Tutor, Customer Service, and Sales Associate while studying full-time. After graduation, she worked as a Junior Radio Reporter, Team Leader, HR Recruitment and Training Officer, College Instructor, and Permanent Public Secondary School Teacher.
She has also jetted off to Japan to teach conversational, business, and academic English to various learners while furthering her education. AL's motto is "Learn to teach, and teach to learn." She believes education is a lifelong process that enriches one's mind, heart, and soul.